Showing posts with label cooking with kids. Show all posts

Monday, April 6, 2009

Sweet Bird's Nests


It's almost Easter! Time for sweet treats. I'm bringing these bird's nests to Mya's class for her "Easter party #1." They're super simple to make. Mya even helped me with them.


Ingredients:
Chow Mein Noodles (the cracker-like stuff - not real chow mein)
Butterscotch Morsels
Cadbury Mini Eggs (yes, we got into our bag before making this)


Step 1: Melt the butterscotch morsels. I use the double boiler method since I don't get good results with my microwave oven. But if you're comfortable with your microwave oven, by all means, go for it.

Step 2: Add chow mein noodles. We added about half a package (or 8 oz.) of noodles.
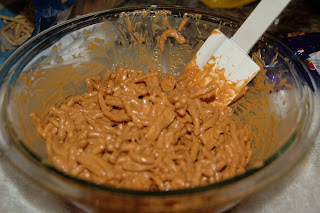
Step 3: Mix. It's more like folding. You don't want to break up the noodles too much.

Step 4: Make nests. Line a baking sheet with wax or parchment paper. Using a tablespoon, scoop the noodles into little piles on the lined sheet. Using your fingers, manipulate the noodles so that they become nest-like.

Step 5: Add eggs. Add the candy eggs while the butterscotch is still melted and they will stick to the nest when it's cooled.

Step 6: Allow to cool and harden. You can either leave them out or do what I did and stick them in the fridge.

And that's it!! Easy peasy. I've got more to make this week–Treats for both kids and adults.

Tuesday, December 2, 2008

I'm one of those moms...


Do you remember when you were a kid, you had that ONE classmate whose birthday you looked forward to because her/his mom would bring a pretty cool treat to class? Well I think I'm turning into that mom. I always sign up to bring snacks for Mya's school parties. For Valentine's day, I brought nicely decorated heart-shaped sugar cookies, on Halloween, I brought Bakerella-inspired pumpkin pops. So I signed up again for the Thanksgiving party and brought these turkey cookies.

I've seen these done before in various ways. But I liked the contents of this version - not too many candy corn (which I have a love-hate relationship with) and lots of chocolate! Mya actually helped me with this. It's basically a fudge-stripe cookie, a peanut butter cup, candy corn, and a Dove chocolate piece. I melted two Dove chocolates in a sandwich bag and used it for "glue."

Mya was able to help me with this, I piped on the chocolate "glue" and Mya put all the pieces in place. The key to getting the Dove chocolate to stick to the bottom is by attaching it while the turkey is still on it's back.

The kids in her class LOVED this. What a departure from... whatever they were getting before!

Pizza with Mya


Mya attends school for 3 hours in the morning. I picked her up one day realizing that I had some pizza dough sitting in the fridge that was one day past it's "use by" date. So we stopped by Fresh & Easy (my new favorite store) and picked up some pepperoni and mozzarella cheese to make a pizza for lunch.

I pulled out the pizza dough and it was about to burst out of it's bag - they weren't kidding about the "use by" date! Mya helped to flatten it out on a well-floured pizza stone and helped spread out the sauce. I let her put on the cheese and pepperoni, which surprisingly, she was meticulous about. She evenly spaced the pepperoni and used just the right amount. We topped it off with dried oregano and drizzled it with olive oil and into a preheated 450 degree oven it went.

8 minutes later, it was done. 10 minutes later it was half gone. It was a pleasant and headache-free way to cook and eat with a kid.

Sunday, March 9, 2008

Easter/Spring Cookies


I did another batch of cookies. This time it's for my church's bake sale. Mya helped by cutting out the cookies. With little kids, you kind of have to guide them as to where to place the cutters on the dough with the least waste. In my case, I placed the cutters and Mya pushed them down and popped them out. She also helped me roll out the dough using my nifty dowel guide system. Usually, she helps with the sprinkles but it was late at night when I decorated. Plus, she had a cold and I didn't want her licking the sprinkles off her fingers then touching the cookies.

I donated 8 sets of 3 cookies, nicely packaged in cello bags filled with Easter grass. All the money goes to the church to pay for their eucharistic supplies. Luckily, I didn't have to sit and sell these - the ladies at the Women's Guild took care of that.

I was stuck as to how much I should price these. Thom, being the sales guy that he is said to price them at $6/set. But there's a fine line between what they're actually worth and what people at our church would pay. Honestly, the bake and craft sales have been dotted by middle of the road tasting and presented baked goods. It's basically a bunch of quick-breads and cookies placed on a paper plate and wrapped in colored saran wrap. So cakes and breads were normally priced at around $2-$3. A plate full of cookies would go for a buck or two.

So I posted this pic on a message board I belong to and asked how I should price the cookies. I got ranges between $3-$5 —Which was pretty accurate in my mind. So I priced them at $5 per set.

Thom dropped the cookie bags off at church this morning. He said that they were the best looking cookies and the best presented items on the table. (I'll get photos of the table later.) We didn't stay for mass at our parish since we were going to the Mission (where we were married) for mass. So we couldn't see the sales progress. Instead Thom called one of the volunteers after the bake sale to see how well they sold.

The verdict...

1. They've never had cookies that looked so good or were well presented.
2. They usually sell cookies for 50-75 cents a piece
3. All the bags sold at the $5 price
4. Everyone at the Women's Guild were SHOCKED they sold for that much
5. We just made $40 for the church :)

It goes to show, putting your time and effort to make things nice will pay in the end. I'm glad I got to do my part in helping. Plus, I got to buy some fun cookie cutters out of it!

Next up... St. Patrick's Day cookies! I'll be baking about 150 shamrock cookies for a Lenten Fish Dinner this Friday. Whoo hoo! More cookie baking - more frosting!!

Saturday, February 16, 2008

My redesigned blog!

I quickly put together this template in Photoshop, placed the images where I wanted them in Dreamweaver and inserted Blogger codes to make it work.

Sounds easy, right?

Well, Blogger recommends that you copy one of their templates and just modify it - rightly so. I didn't have enough time to actually learn how blogger works. Plus, I'm a "learn-by-doing" kind of gal. So this seemed like the way to go. I had my template sitting on my computer for a week before I even attempted to attack this monster. But while modifying and testing code, I found it surprisingly self-explanatory (but quite messy).

I'm sure there's more fancy schmancy things I could do with this but I'm all programmed out this week. I think I've programmed websites and databases all week long and my brain needs a rest.

On a baking note...

I regret that I didn't take photos of the Valentine's day cookies I made for Mya's Preschool. Mya helped put on the sprinkles and I was quite happy (and almost giddy) with the way they turned out.

My nephew, Brandon, came over the other day so I busted out the cookie dough and Mya, Brandon and I made some mini-heart cookies. I piped, they sprinkled. I did a little sprinkling as well. Here's the fruit of our labor:


I hope you all had a wonderful Valentine's Day!

Monday, June 18, 2007

Jello Aquariums

I watch my friend's daughter on Fridays. She is three months younger than Mya and they get along as best as any two-year-olds can get along—That means many squabbles over toys, pushing and grabbing yet they enjoy being around each other. But when I have something to occupy their time, they seem to be a little more calm during the day.

One day, I decided to have them help me make Jello Aquariums. It may not be the healthiest thing to serve a kid but it sure is fun to make (and there's fruit in there). Here are the following supplies and ingredients:

6 clear plastic cups
Canned Fruit Cocktail, strained
Blue Jello
Gummi Fish

Following the instructions on the Jello box, I started to boil 4 cups of water. I gave each girl a spoon and had them partially fill all 6 cups, one at a time, with the fruit cocktail. This will be the "gravel" of the aquarium.

The girls then took turns pouring the package of Jello into a bowl. I added the water to the bowl and they took turns mixing. Of course, I finished the mixing to make sure the gelatin has dissolved.


I let the girls play as I partially filled the cups with the Jello mixture - up to the level of the fruit cocktail. The cups were then placed in the freezer. This will anchor the fruits to the bottom (I learned this the hard way). You can also place it in the fridge, but I only had a few hours before the girls could enjoy their creations.

After a quick freeze (about 20 minutes), the fruit/Jello mixture was solid enough to add the remaining Jello to the cups. I placed it in the fridge for about 45 minutes until partially set.

Once the Jello is partially set, the gummi fish were added to the cups and then placed in the fridge to fully set.


The end result is a fun Jello aquarium that my friend's daughter can take home (and that we can portion for ourselves).

You can also make a bigger aquarium using the same technique. I used the fruit snack fishes which didn't hold up well in the Jello - the coloring came off of the fishes but it was still edible. I think the gummi fish or swedish fish would work out better.