Yes, I'm on a blogging spree today. I just downloaded a bunch of photos off of our camera and I need to do something with them before I forget about them.
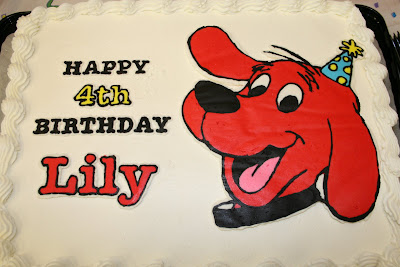
I'm part of a local online message board and one lady named Leslie asked if we knew of anyone who would make Clifford cakes in a small time frame. Apparently, Clifford items and cakes are hard to come by. Due to character rights, bakeries are prohibited to reproduce them. So as a favor I volunteered to help her out with her daughter's cake. I would purchase a plain cake and add the decor.
In the past, I've freehanded a Blue's Clues cake for my friend's daughter's birthday. It was a pull-apart cupcake cake that was quite easy and fun to do. I did a star-tip decoration which I was quite familiar with. She was thrilled when she saw the cake.
So when I volunteered my services, I thought that I would do the same with Clifford. Leslie sent me a few photos of other cakes and I did some research as well. From what I've seen there weren't any star-tip decorated Clifford cakes and I wanted to try something new. I remembered seeing a technique for frozen transfers and I thought this would be a perfect time to try it out. Luckily, Leslie granted me permission to "experiment away."
Frozen transfers need buttery buttercream icing to be more effective. A lot of buttercream icings use an equal amount of shortening to butter and apparently, this just won't cut it for this technique - I guess it doesn't freeze as hard as you need it to.
Here's the recipe I used: Buttercream Icing 3 sticks of butter at room temperature 1 cup shortening 2 tsp vanilla 2 lbs confectioner's sugar, sifted
Using a paddle attachment, beat butter and shortening until well combined. Add vanilla and beat well. Turn the mixer down to low and gradually add the confectioner's sugar until well combined. Beat on medium-high until smooth.
Black icing You know how when you eat black icing, it gets all over your teeth and looks just horrible? Well I found out about a smart technique that reduces the mess-factor. To make a true black icing on buttercream requires A LOT of black icing gel paste. But this one is much easier and saves your black gel paste.
Fudge Icing + A little black gel Paste =
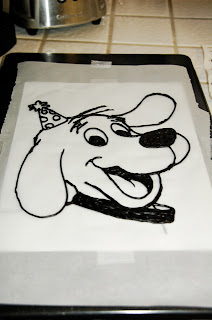
STEP 1: Print out a reverse image of what you want to make and tape it onto a flat surface that will fit in the freezer. I used cookie sheets.
Tape a piece of wax paper on top of the image. I used parchment but should have used wax paper because some of the moisture seeped through the parchment and slightly wrinkled the image.
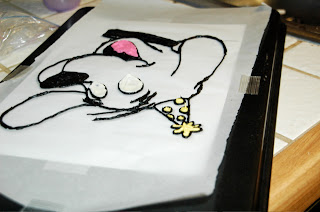
STEP 2: Pipe the outline of the image. Start with the intricate areas first. STEP 3: Fill in the areas in the reverse order. For example, Clifford's eyes, tongue and the dots on the hat will be on the "top." Blue will lay over the hat and red will lay over on the rest of Clifford.
Pick up the wax paper and view the photo from underneath to reduce the icing gaps. If there are gaps smooth them over with a small offset spatula.
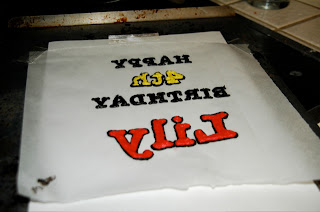
STEP 4: Cover with white buttercream (or whatever color your cake is). Why do this? Because all the layers can be seen from the side when placed on the cake. So I outlined Clifford as well as the letters with white buttercream and spread an even layer over the whole image to even everything out. STEP 5: Freeze for 90 minutes
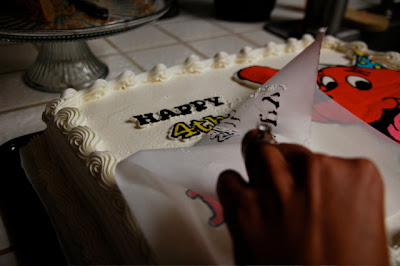
STEP 6: Position image on cake and lightly press into cake. Slowly peel off the wax paper and voila - You have a pretty darn cool image on your cake! Thom asked if they would be able to cut through the image and the answer is YES! The buttercream softens to it's normal consistency and acts just as if you decorated the cake by freehand!
I like this technique and I think I will be doing this quite often or whenever I get a chance to do it. Note to self: next time, use wax paper.
I could get used to decorating plain store-bought cakes. It's less mess in the kitchen and less time baking!
When I was a kid, I remember my Auntie Ebeng brought us a gingerbread house for Christmas. It was stuck together with marshmallow fluff and had spice drops on the peaks of the roof. I stared at it in awe, just imagining what lucky little magical people could live in such a house. Then the staring turned into hunger and my sister and I devoured the thing. Ever since then, I wanted to build a gingerbread house from scratch.
This year, I so happened to pick up the Christmas issue of Martha Stewart living and on the cover was a cake lined with gingerbread building facades. It re-inspired me to take another stab at the gingerbread house. I tried the recipe in the magazine and sadly, the dough was way too sticky to handle. (Martha, I love ya but I can't deal with your dough.) So I modified it a bit and came up with a recipe that has wonderful flavor and is easier to use.
By all means, I'm no expert in making gingerbread houses. This is my first one and I've learned a lot in the process. But I followed a few logical steps.
Here are the steps: 1. Create a template 2. Make the dough and bake the cookies 3. Trim as needed 4. Prepare the board 5. Assemble and decorate
STEP 1: Create a Template Since I'm a graphic designer I used Illustrator to create my design since it's pretty darn accurate with measurements. I just print out the shapes and cut them. But you can draw your shapes out on poster board and assemble them. If they stand in poster board, it will stand as a cookie.
My template had windows on each of the walls so that it could be used with lights inside. I found this to be interesting as I baked... you'll read more about it below.
Step 2: Make the Dough and Bake the Cookies
Molasses Gingerbread Cookie (adapted from Martha Stewart's Molasses Gingerbread Cookie Recipe) Ingredients 5 1/2 cups all-purpose flour, plus more for dusting 1 teaspoon baking soda 1 teaspoon salt 4 teaspoons ground ginger 4 teaspoons ground cinnamon 1 teaspoon ground cloves 1 teaspoon freshly grated nutmeg 2 sticks (16 tablespoons) unsalted butter, room temperature 1 cup packed dark-brown sugar 2 large eggs 1 cup unsulfured molasses
Whisk together flour, baking soda, salt, and spices in a separate bowl.
Beat butter and sugar with a mixer with a paddle attachment until light and fluffy. Add eggs, one at a time and beating well after each egg is added. Beat in molasses. Reduce speed to low and gradually add flour mixture. Beat until just combined. Divide dough into three portions, and wrap each in plastic, flattening each portion out to a disk. Refrigerate for 2 hours or freeze for 30 minutes. The longer you let the dough sit, the more flavorful it gets.
Preheat the oven to 350°F. Generously flour a piece of parchment and roll out the dough to 1/4" thick. Using parchment is very important as the dough is slightly sticky and parchment will reduce the sticking. I usually use 1/4" wooden dowels positioned next to the dough as a guide for my rolling pin. Slide the parchment onto a baking sheet and freeze for 15 minutes.
Cut out to desired shapes and bake for 6-8 minutes. Remove them from the oven and firmly tap them on the counter to flatten the cookies. Bake for 6-8 minutes more until crisp (not darkened).
Step 3: Trim as Needed Like I said above, I had windows in my template. It turns out that my window cutouts expanded towards the inside as the dough baked. Since the dough is still pliable straight out of the oven, I re-cut the windows using a sharp knife.
When the cookies come out of the oven, it will not be the exact shape as when you first put them in there. So trimming will be required. Allow the cookies to completely cool. Using a serrated knife, trim all the edges that meet together so that they attach properly. Trim the bottoms so that the walls are even when they sit on the board.
Step 4: Prepare the Board The house needs something to sit on, right? I found a piece of cardboard and cut out a hole at one end so that some Christmas lights or an electric tea light can be put inside. But you can skip this step if your house doesn't have windows like mine.
Cover the whole thing in aluminum foil and hot glue it onto the board.
Step 5: Assemble and Decorate Royal Icing is the glue for this house. So make it a good one! Here is my recipe:
Royal Icing Ingredients: 2 lbs of confectioner's sugar 6 tablespoons of meringue powder 1 tsp vanilla 1/2 - 1/3 cup of warm water
Fit a mixer with a whisk attachment. On low speed, whisk together the confectioner's sugar and the meringue powder. Slowly add the warm water, a little bit at a time until it's the consistency of peanut butter. Add the vanilla. Add a little more water, about a teaspoon at a time until it is smooth. You want it to be thick initially then thin it out with a little more water as needed.
While using, cover the bowl with a wet towel so the icing doesn't dry out.
Assembling the house: If you have a lot of detail in your house decorate each wall before assembling.
Roof - My roof was made of Necco wafers (which was hard to come by around Christmastime). But you can easily pipe some decorations.
Windows - I made "glass" for the windows by crushing leftover dum-dum pops from Mya's birthday and melting them in a 350°F oven for 8 minutes. I attached these with royal icing. Cover the top of the board with royal icing. Decide how you want to attach the walls - either the side walls attach to the front and back or vice versa.
Fill a piping bag with the thick royal icing and use a star or round tip to generously pipe icing to the edge of the piece that attaches to the wall. For example, if you want the side wall to attach to the front and back, you will pipe icing on the edge of the side wall. Position them on the board and attach the pieces. Continue with the rest of the pieces in the same manner. Re-pipe icing on the inside seams of the house to stabilize.
Decorate as you like and have fun!!
My house had a detachable roof so that a gingerbread family could reside inside. I assembled the roof separately and held them in the right position using cans.
The gingerbread family at home
Detail of light shining through the window
Roof-less house
The whole shebang
So what did I do with the house? As much as I (and my husband) would have loved to have kept it, or at least kept it in the family, it was my intention to give it to my Secret Santa, Annie.
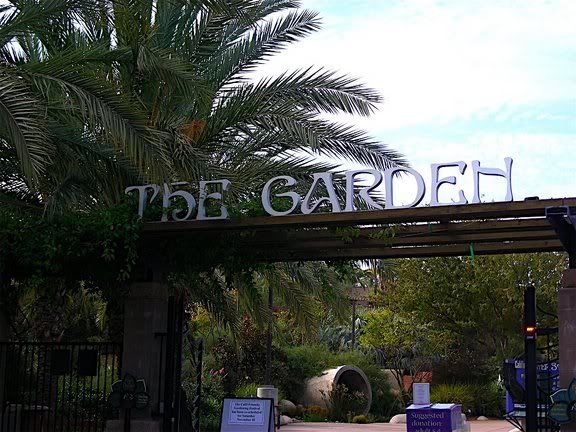
This post is WAY over a month late but we've been busy with school, shoots, and traveling. Mya's Birthday was held at the Water Conservation Garden. The venue was perfect - it had pathways and interesting exhibits to look at and a covered picnic area for us to have our party.
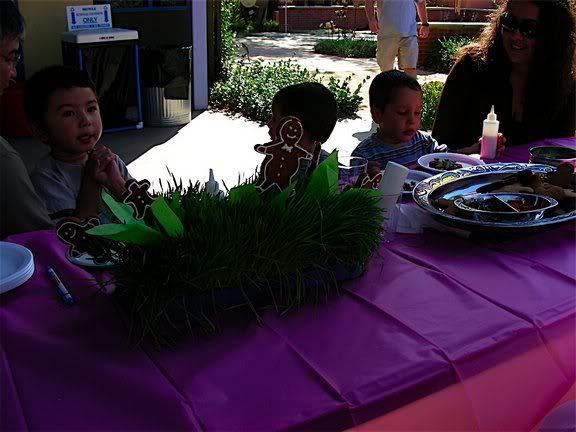
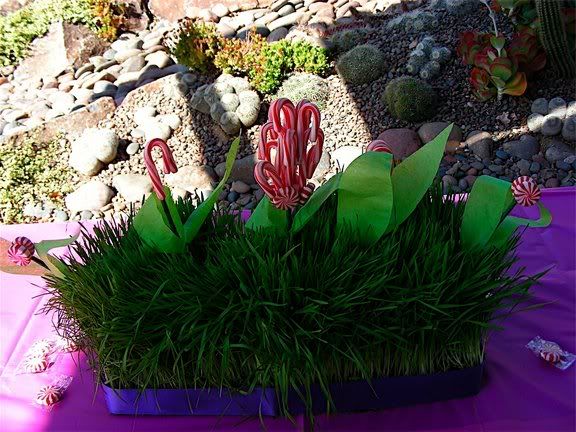
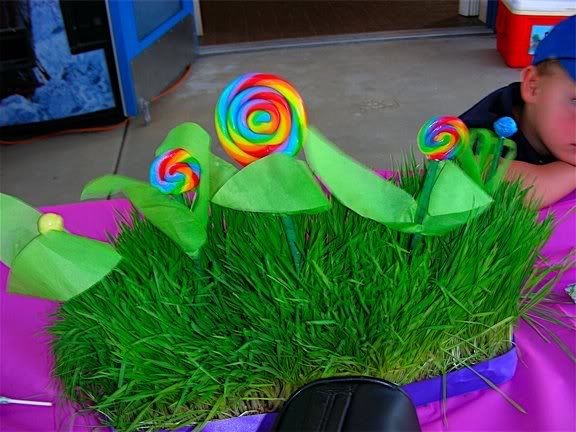
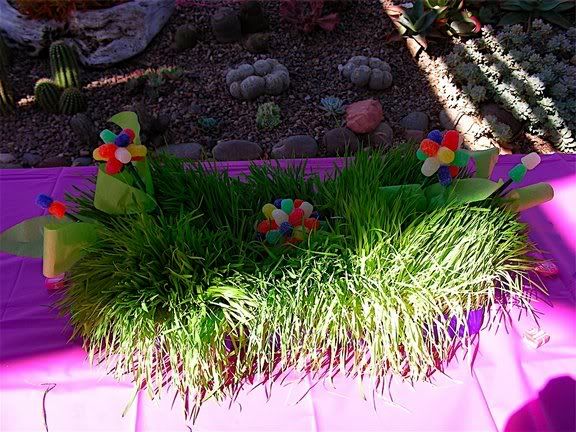
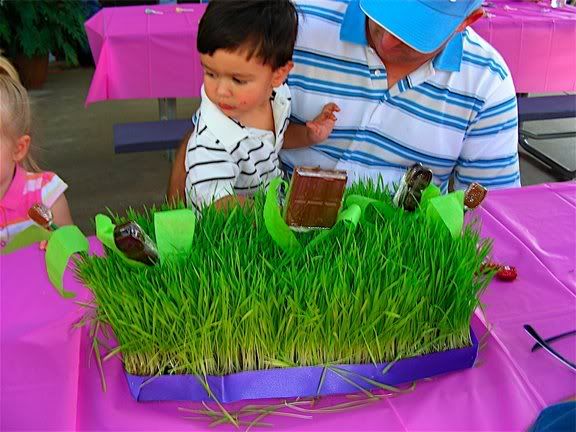
Remember the inspiration for my centerpieces (see previous post)? Well, here are the results. One week prior to Mya's party, I planned a tea party at church where we used the wheat grass strips for the centerpiece. I purchased the grass at Sungrown Organics in the South Bay Area of San Diego. I planned ahead so that I can preserve the grass for one week to re-use at Mya's party. We had 5 picnic tables and I created the centerpieces based on the different areas throughout Candy Land. The leaves were made out of tissue paper.
Mama Ginger Tree: The gingerbread men were baked on the stick then decorated with royal icing.
Peppermint Forest: I glued starlites and mini canes on a stick. Lollipop Woods: I elongated the lollipop sticks by using floraltape to connect them together. Gumdrop Mountains: I glued gumdrops to styrofoam balls and skewered a few. The center ball was too heavy to stand on it's own. So we just let it sit in the grass. Chocolate Swamp: I melted the back of the chocolate bars and candies and sandwiched a stick between the two. The smaller sticks are tootsie rolls. I covered the chocolate with saran wrap so that they don't condensate and turn white.
Overall, I think the grass needed a trim before I used them. They were a little dry but I didn't want to waste them. After the party, I fed them to our cats. They loved it.
Giveaways:
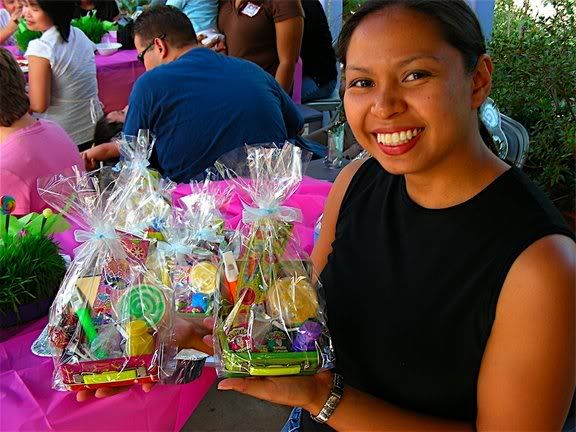
We played a real-life Candy Land game. Guests were given a map of the garden and they were to find certain spots to collect their candy and get their map marked. Once their game pieces were complete, they got their party favor.
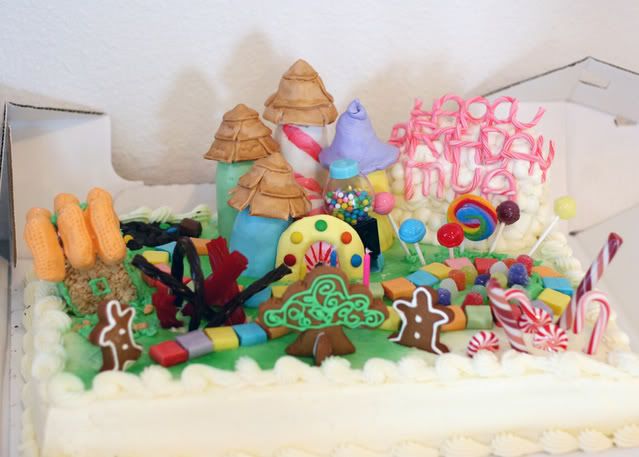
This is the prize/gift bag that we handed out. I totally scored on the tiny lunchboxes - they were at the $1 spot at Target... for 75% off!! 25 cents a piece is not bad for a lunch box! I added a whistle, bubbles, stickers and a lollipop-shaped sugar cookie to the bag. The famous cake... Mya was so excited to get her cake. We kept it at home during the first part of the party to keep it a surprise. We ordered a plain Costco sheet cake and I just added the decorations. Thom took some time-lapse photos while I was decorating the cake. I made all the non-candy pieces a few days earlier.
Here's a photo taken by my friend, Kris, from San Diego Family Photography:
I made Mya's party dress for Halloween and she has worn it 6 times between mid-October through Mid-November. She wanted to be the Fairy Lolly from Candy Land:
I made her crown out of pipe cleaners and Christmas ornaments. Her wings are bent hangers, tulle and painted fabric. I found a regular dress pattern and modified the sleeves and trim to look like Lolly's outfit. The lollipops are fabric that I painted with acrylic paint and appliquéd onto the dress.
The party turned out well. Everyone liked the theme and food was yummy (thanks Dad!).
I can't believe my sweet little girl is turning 3! It seems like it was just yesterday we were holding her like she was a little football in our arms. Now she's a busy little lady, talking, running and jumping... and planning her own party.
My mother-in-law, Karen, got me a subscription to Taste of Home. The recipes are very down-home country, "that can't be good for you but I bet it tastes good." Thom and I have been trying to eat well and lose weight, so needless to say, I haven't tried the recipes yet. However, we got some use out of it as it gave us the inspiration for Mya's birthday party.
It's a Candy Land cake! Mya pulled the magazine off the table a few months ago and saw the cake on the back cover. She immediately said, "I want Candy Land cake for my birthday." And that's when it started. Coincidentally, about a week prior to the magazine arrival, I was bribing Mya with a real Candy Land game if she went #2 in the potty 10 times. So it's interesting how her party theme came about from going poop.
Mya couldn't stop talking about it. In her own words, "I'm going to have 3 candles. Everybody is going to come. All my friends are coming. And they're going to bring wrapping paper, a box, tape, and ribbon. There's going to be lots of candy and everybody is going to eat." Ah, my little Martha Stewart. I can't imagine how future birthday parties will be.
This year, we aren't having Mya's party at our house due to kitchen remodeling. It will be at a Water Conservation Garden in their multipurpose room and patio. So, it's not quite candyland-ish, but there are trails and paths in the garden and we can just pretend it's a game. They do have real peppermint, a "swamp", and gumdrop-shaped plants. I guess it's not too far-fetched.
The Taste of Home issue came out in August so the party idea has been in planning since then. Thom doesn't want me to plan the party since we (ahem, I) have a lot of work that needs to get done. All he wants me to do is the cake and favors. Ugh... but the decorations are the fun part! My dad's cooking and my sister is going to help with the decorations. I can't really plan on baking the cake if our oven is out of commission. So we're going to buy a plain Costco cake and I'm just going to decorate it. I've drawn out plans that are a little more elaborate than the pictured cake. Plus Candy Land has changed quite a bit since I was a kid. I've typed out a few notes while brainstorming...
Get green icing spray for the cake Cut mini gingerbread man for game pieces. Mama Ginger tree - Tree-shaped gingerbread cookies with leaves of green royal icing. Peppermint forest - mini candy cane and starlites Gumdrop mountains - mound marshmallow treats for the mountain and cover with tinted whipped cream and colored sugars. Use a fruit roll for gumdrop pass. Gumdrops line the mountain Lord Licorice - Red Vines and black licorice arches and sticks. Grandma Nut - House made of gingerbread and circus peanut candies. Pipe garden with leaves, vines and "nuts" Lollipop woods - Pipe leaves for the base of the lollipops. Stick Dum-dums, mini swirl pops, and regular sugar pops. Snowflake lake - sugar lake, purple frosting border, area will be where Happy Birthday sign will be. Chocolate Swamp - use See's chocolate lollipops for cattails (pipe leaves for the base), chocolate ganache for the swamp, chocolate chips and chocolate pieces in the swamp. King Candy's Castle - Bubble gum dispenser made from mini cupcakes and a oblong votive filled with bubblegum, MMF gate with candy, marshmallow treat towers covered with MMF. Skittle path. Path - Starburst candy. "Happy Birthday Mya"- MMF twisted to look like candy cane. Shaped, staked on wires and dried.
BTW - MMF is Marshmallow Fondant. It's more tasty than the regular "is this gum I can swallow?" stuff. All it is, is 2 pounds of powdered sugar to one bag of melted marshmallows. You knead it until smooth and you've got fondant!
Since the Candy Land theme was set, we've been looking out for things on sale to have for the party. At the end of September, we were headed for a weigh-in for a weight loss competition and Thom wanted to stop by a store so he can "shed some weight" in the bathroom. We found a Target and while I was waiting for him to emerge from the men's room I gravitated towards the dangerous $1 spot. There, I found these adorable mini lunchboxes in different types of candies: As I was ogling over them, a lady walks up to me and asks, "¿Habla Español?" I politely declined and said, "Lo siento mucho, no, habla Español." LOL. She laughs and says, "Oh...well, I was going to tell you in Spanish but since you speak English, all the items here are 75% off. Look at the sign!" And there it was... a sign for 75% off clearance items. I couldn't believe my eyes and ears. Thom finally emerged from the bathroom and I directed him towards the lunchboxes and did my best sales pitch on why we should get them for Mya's party... oh, and I also emphasized that they're only a 25 cents. He said, "If you're going to get them go get them now before you change your mind. How many do you think? $5 worth?" So we walked out of there with 20 mini lunchboxes for Mya's party. I have to thank my Spanish-Filipino blood for coming through that day. Otherwise I would not have paid attention to that sign.
It's quite convenient that Halloween is 4 days prior to her party. That means we can hit up candy sales, too.
I thought of table centerpieces since we have 5 picnic tables. I thought of cutting wheatgrass in rectangles and sticking lollipops and other candy out of them like they were flowers. My inspiration came from this: Okay, so it's not exactly as I described, but I like the idea of using paper to "fluff up" the centerpiece. While this is quite dramatic with the butterflies, I think I might go simple by using tissue paper. Thanks to a reliable source (Tina), I was able to find flats of wheatgrass at a holistic health center not too far away from me. I'll take these pops and treat them as flowers: Then I'll cut some green tissue paper (which was on sale at Michael's) and cut leaf shapes out of them. I'll attach them to the pop with floral tape. I plan to make some gumdrop flowers by sticking them together with toothpicks, candy canes stay as is, chocolate will be made from candy bars (I'll melt the bottoms and sandwich them between lollipop sticks) and See's pops, and gingerbread men pops will be made as I made the Easter cookie pops.
Favors will be interesting now that I have lunch boxes. I think I'll open them up, place some cookies shaped like lollipops (I don't want to overload on the candy) and other treats in addition to the existing candies, and pop them in a cellophane bag, displaying its contents.
All this for a 3rd birthday?! Well, let's hope things don't get more elaborate in the upcoming years. I think this will all be doable and not overdone.
I'm not a "granola girl" as someone has asked me before. But I do like making granola!! Even my daughter loves it, asking for "more grambola please!" Someone had asked me for my granola recipe so the last time I made it, I actually paid attention to what I was putting in there instead of eyeballing it. I've tried a few experiments and I'm still working on the perfect recipe but here's what I have so far:
5 cups of rolled oats (not quick cook) 1/2 cups of raw pepitas* 1/2 cup of raw sliced almonds* 1/2 cup of pecans* 1/2 cup of wheat bran (or flour, if you don't have wheat bran) 1/3 cup of vegetable oil 1/2 cup of honey 1 tsp of vanilla 3/4 cup of dried cranberries*
* these can be substituted with your favorite nuts or dried fruits. Just cut any large pieces of dried fruit in to smaller pieces.
Directions: Preheat oven to 300°F
Mix rolled oats, nuts, wheat bran and wheat bran in a very large bowl. Whisk together honey, oil and vanilla until combined. Pour the mixture over the dry ingredients and mix until evenly coated.
Spray a baking sheet with oil and spread granola mixture on the sheet. Place in oven and stir every 15 minutes until golden brown (about 30-45 minutes). Allow to cool completely and mix in dried fruits. Granola can be kept in an air tight container for up to 2 weeks (but it never lasts that long in our house).
The wheat bran and honey helps the granola clump together. The oil helps to brown the granola. So if you'd like to alter the clumpiness, I would start here.
Ah, Friday... the two girls are with me again. I always think of what to cook for them since toddlers can be finicky and messy. I looked in the fridge and found some leftover home-made pizza dough from a botched attempt at making grilled pizza (let's just say it turned out very "rustic"). The dough was pretty good, though. In the freezer, there was a bag of chicken tenderloin. My mind starts flipping through it's internal recipe book and I immediately think of Costco's Chicken Bake. Mmm... the ever bad-for-you, 927 calorie chicken bake filled with cream sauce, chicken, mozzarella cheese and bacon. I had an early morning full-body workout that involved weights and yoga so I had to be good with my food choices today. Luckily, there wasn't any milk or cheese in the fridge except for Parmesan cheese (well, we use fat-free stuff anyway so it wouldn't have been all that bad). So I decided to make a tomato sauce-based version of the chicken bake - more like an inside-out pizza. Plus, this would be quite a bit smaller to fit into little hands.
I brought the pizza dough to room temperature for about half an hour. In the meantime, I prepared the sauce, preheated the oven to 400°F and cooked the chicken. I used a can of tomato sauce, added some Italian seasoning, garlic powder and onion powder and reduced it by half to thicken it up. Once that was done, I floured my cutting board, divided the dough into three pieces and stretched them out.
On top of the dough went the tomato sauce, then the chicken piece, more sauce and Parmesan cheese. I wrapped the dough around the chicken and pinched to seal it. The whole package was placed on a Silpat-lined cookie sheet, seam-side down. I brushed the tops with olive oil and sprinkled more Parmesan cheese.
The bakes went into the oven for about 15 minutes. They poofed up nicely with minimal sauce seepage (well, at least on 2 of them).
The girls enjoyed it. Mya ate the whole thing but Kayla was purturbed that there was a huge chicken piece in the center. I told her to eat her protein to build muscle. So she took a bite of chicken and then flexed her arm for me. Funny girl.
I watch my friend's daughter on Fridays. She is three months younger than Mya and they get along as best as any two-year-olds can get along—That means many squabbles over toys, pushing and grabbing yet they enjoy being around each other. But when I have something to occupy their time, they seem to be a little more calm during the day.
One day, I decided to have them help me make Jello Aquariums. It may not be the healthiest thing to serve a kid but it sure is fun to make (and there's fruit in there). Here are the following supplies and ingredients:
6 clear plastic cups Canned Fruit Cocktail, strained Blue Jello Gummi Fish
Following the instructions on the Jello box, I started to boil 4 cups of water. I gave each girl a spoon and had them partially fill all 6 cups, one at a time, with the fruit cocktail. This will be the "gravel" of the aquarium.
The girls then took turns pouring the package of Jello into a bowl. I added the water to the bowl and they took turns mixing. Of course, I finished the mixing to make sure the gelatin has dissolved.
I let the girls play as I partially filled the cups with the Jello mixture - up to the level of the fruit cocktail. The cups were then placed in the freezer. This will anchor the fruits to the bottom (I learned this the hard way). You can also place it in the fridge, but I only had a few hours before the girls could enjoy their creations.
After a quick freeze (about 20 minutes), the fruit/Jello mixture was solid enough to add the remaining Jello to the cups. I placed it in the fridge for about 45 minutes until partially set.
Once the Jello is partially set, the gummi fish were added to the cups and then placed in the fridge to fully set.
The end result is a fun Jello aquarium that my friend's daughter can take home (and that we can portion for ourselves).
You can also make a bigger aquarium using the same technique. I used the fruit snack fishes which didn't hold up well in the Jello - the coloring came off of the fishes but it was still edible. I think the gummi fish or swedish fish would work out better.
I was on the board of a charity event that I attended a few weeks ago and as usual, I struggled over what to wear. I have a few semi-formal dresses that I bought pre-baby. I never liked the way they fit before I had my daughter. Even now, they just don't fit right.
I have this sparkly asymmetrical dress I bought 3 or 4 years ago at Macy's. I'm 4'11" so any dress that goes below the knees make me look even shorter. This dress started at my knees and went down to my calf. I was tired of wearing long dresses and couldn't find any short dresses that weren't "hoochie" so this dress was a compromise between the two. I never felt that it looked good on me even though it was comfortable. This photo was taken on our Eastern Caribbean cruise this past January it's why I'm tipping to one side - the boat was really rocking.
I finally decided it was time to put my sewing machine to good use and shorten the dress. The DAY OF the event, I put my dress on, stood on a step ladder in front of a bathroom mirror and pinned where I thought I should cut it. My initial intent was to just make it one length and hem the bottom.
I put my daughter down for a nap, quickly measured and pinned my cut lines on the dress (my chalk pencil was too hard for this dress) and started cutting away. It was quite easy - I probably chopped off nine inches. I tried the dress on and lo and behold - it's too short! Duh, I forgot to add an extra 1-1/2 inch to the cut line to make room for the hem. That's what I get for trying to rush through a project during Mya's nap time. The material is not the type where you can make a rolled hem so that was out of the question. So I decided it needed something more.
Once my husband got home from his errands, I quickly headed over to JoAnn's Fabric store for some fringe. I couldn't find the right thickness of fringe but I found one with the right length. The fringe was a little light but it's all I could get. $8 later (I bought a new ripper, too), I'm home pinning the fringe to my dress.
My daughter woke up from her nap and watched as I started sewing the fringe to the dress. It was a painless procedure and I only made a mistake in a one inch area where it didn't attach to the dress. It was a quick fix and the whole sewing part probably took less than 10 minutes. I tried it on and was satisfied. It was okay for a 2 hour project - most of it was waiting time for my husband to get home and traveling/shopping time to and from the fabric store.
I got many compliments on the dress at the fundraiser and I felt good in it. I had quite a story to tell whenever someone asked me about it. Unfortunately, all photos taken of me during that evening had me from the waist up.
My husband and I are attending a dinner tomorrow/today we are requested to bring dessert. I usually make desserts after my daughter has gone to sleep for the night so that I can have the kitchen to myself. So I usually end up watching (although it's more like listening to) Jay Leno and Conan while I make my dessert. It's quite relaxing.
The dessert we are bringing is a berry tart made in individual servings.
Yes, it's a PITA sometimes to make individual servings but I like them for the following reasons:
Each person can have their own piece without feeling ripped off because they had to scrape the pie pan for a serving.
Sometimes after eating a large meal, you only want a bite of dessert
They're cute
This recipe was adapted from a three berry tart recipe from one of those booklets you find at the checkout line. My version uses a pastry crust (a pate brisee) instead of an animal cracker crust just because a cookie/graham cracker crust would crumble in someone's hand.
This recipe for Pate Brisee is so simple and the crust comes out nice and flaky.
Pate Brisee (Shortcrust Pastry) Makes 2 9-inch pie shells or 24-36 mini tarts
Ingredients: 2-1/2 cups of all purpose flour 1 teaspoon salt 1 tablespoon of sugar 1 cup (2 sticks) of unsalted butter cut into cubes and chilled 1/4 to 1/2 cup of ice water
Tools: Rolling pin Mini cupcake pans or mini tart pans Fork or parchment paper/aluminum foil and uncooked dried beans
In a food processor, pulse together the flour, salt and sugar until combined. Add butter and pulse until butter chunks beceome pea-sized. Add water slowly until it just comes together. It should look a little dry and if you squeeze a little bit in your hands, it should come together. Don't over-pulse or the dough will be tough. Turn out the dough onto a board and bring it together with your hands. Divide the dough in half and wrap each of the halves in plastic wrap. Refrigerate at least one hour to allow the gluten do develop.
30 minutes before rolling the dough, bring the dough out of the fridge to room temperature. On a lightly floured board, roll out the dough to 1/8 of an inch. When you roll out the dough, keep the dough moving by picking it up and rotating it every few passes of the rolling pin. This will prevent sticking.
Use a 2-1/2 inch round cookie cutter to cut out the circles for your mini tarts. Press them down the bottom and sides of your mini cupcake pan or tart pan. Dock the dough (that's a fancy way of saying poke holes in the dough) with your fork along the bottom and sides of the cake pan. This will reduce the uneven rising in the oven. Place in the fridge for 30 minutes before baking. Alternatively, you can cut small pieces of aluminum foil or parchment and tuck them in your dough and fill it with pie weights or uncooked dried beans and then place them directly in the oven (no need to refrigerate, but it's better to let it rest if you have the time).
Bake at 400°F for 20-25 minutes or until the dough is lightly browned. Allow to cool completely before filling.
Cream Cheese Filling makes enough for one pie or one large tart pan or 24-36 mini muffin cups
Ingredients: 8-oz package of cream cheese at room temperature (neufchatel works great, too) 1 cup of heavy cream 1/2 cup of granulated sugar zest of 1/2 a lemon 2 tablespoons fresh-squeezed lemon juice 1/2 tsp vanilla extract
Beat cream cheese, sugar, lemon zest, lemon juice and vanilla extract until light and fluffy. Add heavy cream and beat until stiff peaks form. Scrape the bowl frequently.
Filling the pastry cups Fit a large star tip (Ateco #824) on a 16-inch pastry bag. Fill the bag with the cream cheese filling. Pipe nice swirlies in the cups to about 1/2 inch - 3/4 inch above the crust. Refrigerate at least 3 hours or overnight.
Berry Top This is pretty straightforward. Fresh strawberries, blackberries, blueberries and raspberries work well together. I pick two or three berries for the tarts. The key is contrasting colors so try not to work with both raspberries and strawberries together (unless you're going for a red theme). Quarter regular-sized hulled strawberries. I had gigantor strawberries and needed to cut them into eighths.
Glaze: 2-tbsp of strawberry or seedless raspberry preserves and 1 tbsp of water. Heat preserves and water in the microwave for 30 seconds until melted.
Push two or three berries onto the peaks of the filled cups. Lightly brush glaze over the berries to keep the berries shiny and moist.
You can make this into a large tart with a graham cracker crust and it is a HIT at parties. It's also about 500 calories for 1/10th of a piece of pie. That's why I like little bites better.
And there you have it! Mini berry tarts. Cute, sophisticated, and oh-so-yummy!
I enjoy making sugar cookies because it can suit any occasion, it allows me to be creative, it's portable and gosh darn it, people like them!! I've tried a few recipes but the one that I keep going back to is a recipe from Joyofbaking.com. I also use the Royal Icing recipe with Meringue Powder and substitute almond extract for vanilla extract.
Every Easter, my sister and close family friends make Easter baskets for all our kids (a total of 9). This year, we all made a pact to NOT put candy, particularly jellybeans, in the baskets. So I decided on making cookie pops.
I searched high and low for cute (cheap) cookie cutters and I found a 4-piece set at Wal-Mart for $1.88. They were cheap alright... the cutters were plastic and a little flimsy. If I could quote my father-in-law, "whoever designed this should be shot." Well, I'm exaggerating. They were flimsy and there were sections that were so narrow that the dough would break when you removed them from the cutter or the board. Bottom line, I bought them without really looking at them and for the most part, they worked.
Since I was planning on making these cookies into lollipops, I needed sticks. I was in a rush while at Wal-Mart and got 50 Wilton lollipop sticks without really thinking it through. What's that you say? Yes, I'm a mom and I've lost some brain cells due to pregnancy. Plus, I had my 2-year-old with me whining, "I'm hungry." So you take what you can get when you need to hurry up and get out, right? But I digress... Lollipop sticks, the kind you use for candy, shouldn't be put in the oven because they are made out of paper. There are sticks made especially for cookie lollipops that are pretty much wooden dowels. You can also use popsicle sticks. But I had what I had and I crossed my fingers that I wouldn't set my house on fire.
Rolling the dough I usually experiment with different techniques when making sugar cookies. The recipe calls for refrigerating the dough before rolling it out. I've done this in the past and have found the dough awfully hard to roll out without cracking. But, cutting out cookies is very challenging when the dough is very soft. My solution - roll it out on parchment paper then refrigerate it.
I worked with 1/4 of the dough at a time. Because these cookies have to be thick to insert the sticks, I needed to have something to make sure that the dough is rolled out evenly and at the perfect thickness. I found two 1/4-inch dowels leftover from a cake project and placed them on opposite sides of the dough. The dowels worked as guide to keep the dough at 1/4 inch thickness while the rolling pin does it's job. There was some sticking - a good tip I learned from Alton Brown is to use powdered sugar instead of flour to prevent the dough from sticking to your rolling pin. Adding more flour to the dough will make it tough. I have a powdered sugar shaker that puts just the right amount on the dough.
Once the dough is at the proper thickness, I place it on a cookie sheet, cover it with plastic wrap and refrigerate it. I work with the rest of the dough, stacking them on top of each other in the fridge when I'm finished with them. After an hour, the dough is ready to be cut.
Cutting and Baking Preheat the oven to 350°F (sorry, I don't have any high-altitude settings) and start cutting. Cutting is pretty straightforward. But there is a little technique to inserting the sticks. It's simple, really. When you insert the sticks, the dough will shift and create a bump. All you do is tap the dough where it bumps up as you insert the sticks to flatten it out. No need to worry that your once-flat dough is a little buckled. You're going to cover that with icing anyway. Gently place the cookie dough pops on a new parchment-covered cookie sheet and place them in the oven when filled.
Bake at 350°F - ovens vary but start out with 10 minutes. Because my oven always takes a little longer to get good results, my cookies turn out perfect after 14 minutes. I usually cut more cookies as I bake and place them in the fridge until they're ready to go in the oven. Keeping your cookies cold will prevent them from spreading and losing their shape.
Icing Allow the cookies to cool completely and then start icing. As I said, I make the Royal Icing using the Powdered Meringue recipe and vanilla extract. There are some purists who say NOT to use regular vanilla extract but to use clear vanilla so that it doesn't discolor your white icing. I haven't had any complaints that the icing is slightly off-white. I don't even notice it myself! Besides, I'm usually adding food coloring so it doesn't matter. I think almond extract gives it a little bit of a chemical taste and I just like the flavor of vanilla.
Start out by piping the outline of the cookie. If you're using several colors, one tip I have is to use plastic zip bags to pipe icing. That way you're not constantly cleaning your reusable piping bags. I still use my small round piping tip to make the outlines just because cutting the tip of the bag gives me unexpected shapes and results when I pipe the outline of the cookies.
After the outlines have dried, thin out the icing with a LITTLE bit of water. I emphasize "little" because it's easy to make it too runny and unmanageable. Place in another zip bag, cut the tip and pipe it inside the outline. Don't put too much, you can get an offset spatula and spread out the frosting. It will come out smooth if you thinned it out enough. While you're doing all of this, cover the unused icing with a wet towel so it doesn't dry out.
If you're going to add more details (like the eyes and nose on the bunny) wait until the icing has completely dried or the colors will run. My bunny has as sort-of anime look to it with it's wide tiny eyes.
Allow them to dry completely before transporting or wrapping. And there you have it! Cookies on a stick. My house didn't burn down, by the way. The sticks worked out perfectly and I didn't feel bad about disposing them. I hate wasting things and feel more guilty disposing real wood vs. paper. So I think I'll stick to paper next time. I guess as long as my oven temp stays at 350°F it won't burn.
I made a double batch of this recipe for Easter and gave out cookies to the choir at church and some of the kids. Even the adults became like kids when they got these cookies... they were fighting over the bunnies.
I've toyed with a few ideas with what I'd like for my blog. My mother-in-law calls me the "Martha Stewart of the West. " It's flattering but I cannot live up to that title. I can figure out how things work, how food is made, and how things should work. It's a lot of common sense and a little sleuthing that makes ideas come full circle.
Here you'll find my recent projects - successes and failures. I hope you enjoy it!

 In the past, I've freehanded a Blue's Clues cake for my friend's daughter's birthday. It was a pull-apart cupcake cake that was quite easy and fun to do. I did a star-tip decoration which I was quite familiar with. She was thrilled when she saw the cake.

 STEP 5:
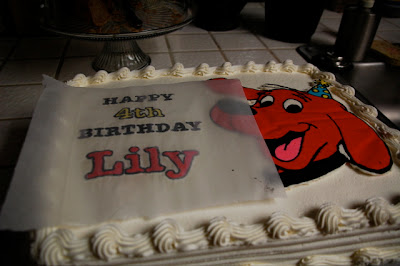


 STEP 5: