Saturday, December 29, 2007

Frozen Transfers - Why didn't I think of doing this before?!

Yes, I'm on a blogging spree today. I just downloaded a bunch of photos off of our camera and I need to do something with them before I forget about them.

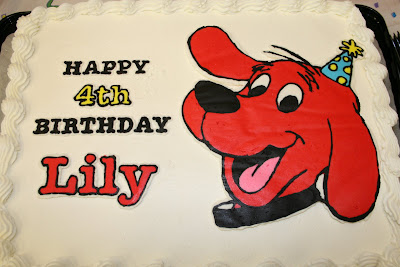
I'm part of a local online message board and one lady named Leslie asked if we knew of anyone who would make Clifford cakes in a small time frame. Apparently, Clifford items and cakes are hard to come by. Due to character rights, bakeries are prohibited to reproduce them. So as a favor I volunteered to help her out with her daughter's cake. I would purchase a plain cake and add the decor.

In the past, I've freehanded a Blue's Clues cake for my friend's daughter's birthday. It was a pull-apart cupcake cake that was quite easy and fun to do. I did a star-tip decoration which I was quite familiar with. She was thrilled when she saw the cake.

So when I volunteered my services, I thought that I would do the same with Clifford. Leslie sent me a few photos of other cakes and I did some research as well. From what I've seen there weren't any star-tip decorated Clifford cakes and I wanted to try something new. I remembered seeing a technique for frozen transfers and I thought this would be a perfect time to try it out. Luckily, Leslie granted me permission to "experiment away."

Frozen transfers need buttery buttercream icing to be more effective. A lot of buttercream icings use an equal amount of shortening to butter and apparently, this just won't cut it for this technique - I guess it doesn't freeze as hard as you need it to.

Here's the recipe I used:

Buttercream Icing

3 sticks of butter at room temperature
1 cup shortening
2 tsp vanilla
2 lbs confectioner's sugar, sifted

Using a paddle attachment, beat butter and shortening until well combined. Add vanilla and beat well. Turn the mixer down to low and gradually add the confectioner's sugar until well combined. Beat on medium-high until smooth.

Black icing
You know how when you eat black icing, it gets all over your teeth and looks just horrible? Well I found out about a smart technique that reduces the mess-factor. To make a true black icing on buttercream requires A LOT of black icing gel paste. But this one is much easier and saves your black gel paste.


Fudge Icing + A little black gel Paste =


STEP 1
:
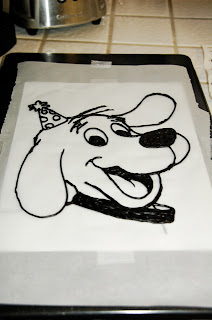
Print out a reverse image of what you want to make and tape it onto a flat surface that will fit in the freezer. I used cookie sheets.

Tape a piece of wax paper on top of the image. I used parchment but should have used wax paper because some of the moisture seeped through the parchment and slightly wrinkled the image.

STEP 2:
Pipe the outline of the image. Start with the intricate areas first.

STEP 3:
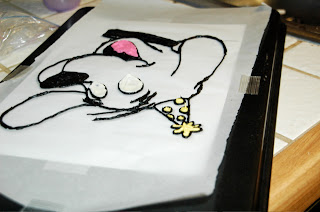
Fill in the areas in the reverse order. For example, Clifford's eyes, tongue and the dots on the hat will be on the "top." Blue will lay over the hat and red will lay over on the rest of Clifford.

Pick up the wax paper and view the photo from underneath to reduce the icing gaps. If there are gaps smooth them over with a small offset spatula.


STEP 4:
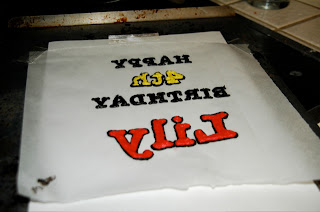
Cover with white buttercream (or whatever color your cake is). Why do this? Because all the layers can be seen from the side when placed on the cake. So I outlined Clifford as well as the letters with white buttercream and spread an even layer over the whole image to even everything out.
STEP 5:
Freeze for 90 minutes

STEP 6:
Position image on cake and lightly press into cake. Slowly peel off the wax paper and voila - You have a pretty darn cool image on your cake!


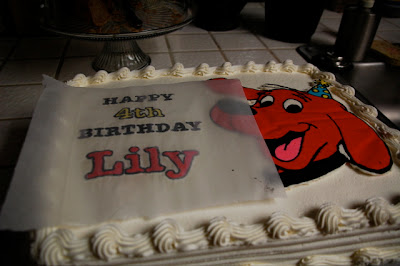
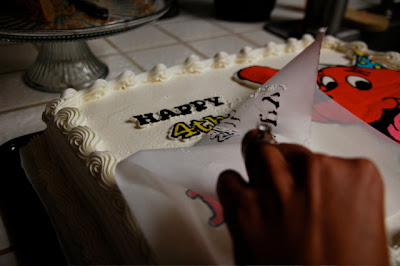
Thom asked if they would be able to cut through the image and the answer is YES! The buttercream softens to it's normal consistency and acts just as if you decorated the cake by freehand!

I like this technique and I think I will be doing this quite often or whenever I get a chance to do it. Note to self: next time, use wax paper.

I could get used to decorating plain store-bought cakes. It's less mess in the kitchen and less time baking!

Gingerbread House


When I was a kid, I remember my Auntie Ebeng brought us a gingerbread house for Christmas. It was stuck together with marshmallow fluff and had spice drops on the peaks of the roof. I stared at it in awe, just imagining what lucky little magical people could live in such a house. Then the staring turned into hunger and my sister and I devoured the thing. Ever since then, I wanted to build a gingerbread house from scratch.

This year, I so happened to pick up the Christmas issue of Martha Stewart living and on the cover was a cake lined with gingerbread building facades. It re-inspired me to take another stab at the gingerbread house. I tried the recipe in the magazine and sadly, the dough was way too sticky to handle. (Martha, I love ya but I can't deal with your dough.) So I modified it a bit and came up with a recipe that has wonderful flavor and is easier to use.

By all means, I'm no expert in making gingerbread houses. This is my first one and I've learned a lot in the process. But I followed a few logical steps.

Here are the steps:
1. Create a template
2. Make the dough and bake the cookies
3. Trim as needed
4. Prepare the board
5. Assemble and decorate

STEP 1: Create a Template
Since I'm a graphic designer I used Illustrator to create my design since it's pretty darn accurate with measurements. I just print out the shapes and cut them. But you can draw your shapes out on poster board and assemble them. If they stand in poster board, it will stand as a cookie.

My template had windows on each of the walls so that it could be used with lights inside. I found this to be interesting as I baked... you'll read more about it below.

Step 2: Make the Dough and Bake the Cookies

Molasses Gingerbread Cookie
(adapted from Martha Stewart's Molasses Gingerbread Cookie Recipe)

Ingredients

5 1/2 cups all-purpose flour, plus more for dusting
1 teaspoon baking soda
1 teaspoon salt
4 teaspoons ground ginger
4 teaspoons ground cinnamon
1 teaspoon ground cloves
1 teaspoon freshly grated nutmeg
2 sticks (16 tablespoons) unsalted butter, room temperature
1 cup packed dark-brown sugar
2 large eggs
1 cup unsulfured molasses

Whisk together flour, baking soda, salt, and spices in a separate bowl.

Beat butter and sugar with a mixer with a paddle attachment until light and fluffy. Add eggs, one at a time and beating well after each egg is added. Beat in molasses. Reduce speed to low and gradually add flour mixture. Beat until just combined. Divide dough into three portions, and wrap each in plastic, flattening each portion out to a disk. Refrigerate for 2 hours or freeze for 30 minutes. The longer you let the dough sit, the more flavorful it gets.

Preheat the oven to 350°F. Generously flour a piece of parchment and roll out the dough to 1/4" thick. Using parchment is very important as the dough is slightly sticky and parchment will reduce the sticking. I usually use 1/4" wooden dowels positioned next to the dough as a guide for my rolling pin. Slide the parchment onto a baking sheet and freeze for 15 minutes.

Cut out to desired shapes and bake for 6-8 minutes. Remove them from the oven and firmly tap them on the counter to flatten the cookies. Bake for 6-8 minutes more until crisp (not darkened).

Step 3: Trim as Needed
Like I said above, I had windows in my template. It turns out that my window cutouts expanded towards the inside as the dough baked. Since the dough is still pliable straight out of the oven, I re-cut the windows using a sharp knife.

When the cookies come out of the oven, it will not be the exact shape as when you first put them in there. So trimming will be required. Allow the cookies to completely cool. Using a serrated knife, trim all the edges that meet together so that they attach properly. Trim the bottoms so that the walls are even when they sit on the board.

Step 4: Prepare the Board
The house needs something to sit on, right? I found a piece of cardboard and cut out a hole at one end so that some Christmas lights or an electric tea light can be put inside. But you can skip this step if your house doesn't have windows like mine.

Cover the whole thing in aluminum foil and hot glue it onto the board.

Step 5: Assemble and Decorate
Royal Icing is the glue for this house. So make it a good one! Here is my recipe:

Royal Icing
Ingredients:
2 lbs of confectioner's sugar
6 tablespoons of meringue powder
1 tsp vanilla
1/2 - 1/3 cup of warm water

Fit a mixer with a whisk attachment. On low speed, whisk together the confectioner's sugar and the meringue powder. Slowly add the warm water, a little bit at a time until it's the consistency of peanut butter. Add the vanilla. Add a little more water, about a teaspoon at a time until it is smooth. You want it to be thick initially then thin it out with a little more water as needed.

While using, cover the bowl with a wet towel so the icing doesn't dry out.

Assembling the house:
If you have a lot of detail in your house decorate each wall before assembling.

Roof - My roof was made of Necco wafers (which was hard to come by around Christmastime). But you can easily pipe some decorations.

Windows - I made "glass" for the windows by crushing leftover dum-dum pops from Mya's birthday and melting them in a 350°F oven for 8 minutes. I attached these with royal icing.


Cover the top of the board with royal icing. Decide how you want to attach the walls - either the side walls attach to the front and back or vice versa.

Fill a piping bag with the thick royal icing and use a star or round tip to generously pipe icing to the edge of the piece that attaches to the wall. For example, if you want the side wall to attach to the front and back, you will pipe icing on the edge of the side wall. Position them on the board and attach the pieces. Continue with the rest of the pieces in the same manner. Re-pipe icing on the inside seams of the house to stabilize.

Decorate as you like and have fun!!

My house had a detachable roof so that a gingerbread family could reside inside. I assembled the roof separately and held them in the right position using cans.

The gingerbread family at home
Detail of light shining through the window

Roof-less house
The whole shebang

So what did I do with the house? As much as I (and my husband) would have loved to have kept it, or at least kept it in the family, it was my intention to give it to my Secret Santa, Annie.

Annie, I hope you're enjoying it!

Friday, December 14, 2007

Mya's Candyland Birthday - The Result

This post is WAY over a month late but we've been busy with school, shoots, and traveling. Mya's Birthday was held at the Water Conservation Garden. The venue was perfect - it had pathways and interesting exhibits to look at and a covered picnic area for us to have our party.


Remember the inspiration for my centerpieces (see previous post)? Well, here are the results. One week prior to Mya's party, I planned a tea party at church where we used the wheat grass strips for the centerpiece. I purchased the grass at Sungrown Organics in the South Bay Area of San Diego. I planned ahead so that I can preserve the grass for one week to re-use at Mya's party. We had 5 picnic tables and I created the centerpieces based on the different areas throughout Candy Land. The leaves were made out of tissue paper.

Mama Ginger Tree:
The gingerbread men were baked on the stick then decorated with royal icing.

Peppermint Forest:
I glued starlites and mini canes on a stick.

Lollipop Woods:
I elongated the lollipop sticks by using floraltape to connect them together.

Gumdrop Mountains:
I glued gumdrops to styrofoam balls and skewered a few. The center ball was too heavy to stand on it's own. So we just let it sit in the grass.

Chocolate Swamp:

I melted the back of the chocolate bars and candies and sandwiched a stick between the two. The smaller sticks are tootsie rolls. I covered the chocolate with saran wrap so that they don't condensate and turn white.

Overall, I think the grass needed a trim before I used them. They were a little dry but I didn't want to waste them. After the party, I fed them to our cats. They loved it.

Giveaways:
We played a real-life Candy Land game. Guests were given a map of the garden and they were to find certain spots to collect their candy and get their map marked. Once their game pieces were complete, they got their party favor.

This is the prize/gift bag that we handed out. I totally scored on the tiny lunchboxes - they were at the $1 spot at Target... for 75% off!! 25 cents a piece is not bad for a lunch box! I added a whistle, bubbles, stickers and a lollipop-shaped sugar cookie to the bag.

The famous cake...
Mya was so excited to get her cake. We kept it at home during the first part of the party to keep it a surprise. We ordered a plain Costco sheet cake and I just added the decorations. Thom took some time-lapse photos while I was decorating the cake. I made all the non-candy pieces a few days earlier.


Here's a photo taken by my friend, Kris, from San Diego Family Photography:

I made Mya's party dress for Halloween and she has worn it 6 times between mid-October through Mid-November. She wanted to be the Fairy Lolly from Candy Land:


I made her crown out of pipe cleaners and Christmas ornaments. Her wings are bent hangers, tulle and painted fabric. I found a regular dress pattern and modified the sleeves and trim to look like Lolly's outfit. The lollipops are fabric that I painted with acrylic paint and appliquéd onto the dress.

The party turned out well. Everyone liked the theme and food was yummy (thanks Dad!).