|
 Do you remember when you were a kid, you had that ONE classmate whose birthday you looked forward to because her/his mom would bring a pretty cool treat to class? Well I think I'm turning into that mom. I always sign up to bring snacks for Mya's school parties. For Valentine's day, I brought nicely decorated heart-shaped sugar cookies, on Halloween, I brought Bakerella-inspired pumpkin pops. So I signed up again for the Thanksgiving party and brought these turkey cookies. I've seen these done before in various ways. But I liked the contents of this version - not too many candy corn (which I have a love-hate relationship with) and lots of chocolate! Mya actually helped me with this. It's basically a fudge-stripe cookie, a peanut butter cup, candy corn, and a Dove chocolate piece. I melted two Dove chocolates in a sandwich bag and used it for "glue." Mya was able to help me with this, I piped on the chocolate "glue" and Mya put all the pieces in place. The key to getting the Dove chocolate to stick to the bottom is by attaching it while the turkey is still on it's back. The kids in her class LOVED this. What a departure from... whatever they were getting before!
 Mya attends school for 3 hours in the morning. I picked her up one day realizing that I had some pizza dough sitting in the fridge that was one day past it's "use by" date. So we stopped by Fresh & Easy (my new favorite store) and picked up some pepperoni and mozzarella cheese to make a pizza for lunch. I pulled out the pizza dough and it was about to burst out of it's bag - they weren't kidding about the "use by" date! Mya helped to flatten it out on a well-floured pizza stone and helped spread out the sauce. I let her put on the cheese and pepperoni, which surprisingly, she was meticulous about. She evenly spaced the pepperoni and used just the right amount. We topped it off with dried oregano and drizzled it with olive oil and into a preheated 450 degree oven it went. 8 minutes later, it was done. 10 minutes later it was half gone. It was a pleasant and headache-free way to cook and eat with a kid.
As you can see in the previous post, Mya was a robot for Halloween. She also wanted a robot birthday party and has been talking about it since August. I have to admit, this was the least planned party that I've ever thrown. Usually I'd be up on every detail but I didn't get to most of the planning until two weeks before the party. The only thing that was ready were the invitations. Thom made the invitations since I was busy with the new baby. It was a CD with a recording of a robot voice inviting guests to the party with the song "Mr. Roboto" closing the message. RSVPs were done via website.  We had about 50 guests RSVP through our website - which was when I realized that I needed to make an emergency call to dad to help out with food. He really came through with all the food - it fed everyone and there was enough for "to-go" containers. We had a few games and activities for the kids and parents. There was the limbo, "Robot Says", musical chairs with parent/child pairs, the chicken dance (per Mya's request). Kids made robot costumes with their parent's help: Thanks to Mr. Jerry, we had computer parts and discs, Thom raided Costco for their cardboard boxes and we used part of our mega roll of aluminum foil to make the robots. We had glue and tape available to connect all the parts We had a robot parade once all the costumes were made. The parents were real creative!! Kids made robots out of marshmallows and toothpicks. It's interesting how robots compare from child to child: Next was cake time! Due to time constraints, I couldn't make a whole robot like I I originally planned. So she just got a big robot head. Just for the record - some kid put that tiara on Mya - She's not a "princess" type of kid at all. Kids left with a goody bag containing "robot parts" such as wires (string licorice), buttons (M&Ms), circuit boards (Andes mints), Nerds and this plush robot that I sewed up and stuffed with the help of Phuong:  All in all, it was a great party despite us cleaning and prepping from the moment we woke up until an hour into party time. Mya had fun as well - you could tell since she didn't mind having her shoes on the wrong feet for the entire party, she got grass stains in her jeans and muddied up her nice white top. Next time we'll try not to plan on having a baby so close to another birthday. Maybe we'll be more prepared next time.
 Mya wanted to be a robot for Halloween this year. She's been talking about it since August. I was quite excited to hear about her costume. I've always wanted to do something with cardboard boxes. I made her costume out of a kitty litter box, silver wrapping paper, thumb tacks, circuit boards, dryer ducting, $2.75 worth of stretchy silver fabric, an old headband and of course, aluminum foil. I ended up having to modify the costume last minute to make it more comfortable for her. I just added some cotton batting to the inside of the box so that it balances better and pads her shoulders. Big thanks to "Mr. Jerry" for the motherboard and sound card. It really made the costume!  Unfortunately, Mya wasn't really in a good mood that day. She had a pain in her right leg and some rashes - which we found out later was shingles. She didn't feel like dressing up at school but reluctantly dressed up for trick-or-treating at the mall. She was a hit, though. Everyone commented on what a great costume it was. What a trooper - I wish we would have known about the shingles before Halloween.
As I've mentioned, I'm a graphic designer/web programmer and own a company with my husband. Recently we launched THREE websites within one month. That means we've been busy!!   And last, but not least, San Diego Public Library Foundation Overview and before and after photos So, what have I done with these sites? I pretty much rebuild them from the ground up with the design and function. Some are more involved than others - for example, the San Diego Public Library Foundation site required a feature where the text and photos could be editable by the client. That meant that I had to program a database and the "public" and "administrative" ends of the website all while making sure the site looks "pretty."
Designers don't necessarily dabble in the programming and tend to design sites without thinking of how things will work with dynamic data. Programmers are more like the "nerds" who can make things work, but sometimes they don't think about making user-friendly interfaces. I like to consider myself as both nerd and designer. Yes, I got good grades in school, graduated top of the class, etc. But I've had a long-time love for design, arts and crafts. It's a nice balance.
We don't just do websites, although it is a majority of our business. We do print items (business collateral, brochures, etc) and marketing consultation as well.
Microwave cookies... WHAT?! I had some leftover pre-cut chocolate sugar cookie dough from Mya's Halloween goodie bags for her classmates. There were only 5 pieces in the fridge that didn't make it in the oven (didn't want to waste energy for 5 cookies). So in desperation for a cookie, I threw one in the microwave oven on top of parchment paper for 45 seconds on high. I stopped the microwave when I started smelling something burning. I pulled out the cookie and sure enough, the center was a bit charred but the outside was perfect. So I ate it anyway. I experimented again (in the name of science, of course). I threw another in the microwave for 45 seconds at 70% power. I had to stop it after 40 seconds because I had a feeling that it might burn again. It didn't burn, but it did cook a bit more in the center than on the outside. I ate that one as well. My last attmept (remember, this is for science - not hunger), I threw another one in at 40 seconds, 60% power. I think it came out just right. Just like regular sugar cookies, I had to let it cool off before it hardened. It tasted just fine. I think I may have to experiment more with microwaving cookie dough. It might be a nice trick to have when I need a cookie. I seem to always have cookie dough in the fridge or freezer. What happened to the other 2 pieces of cookie dough? Leave it to Thom to eat it raw.
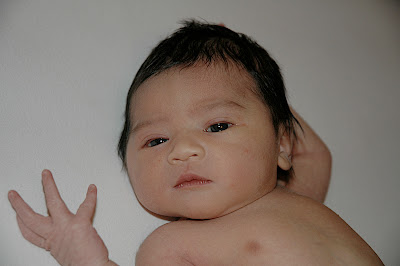
Solana Corrine was born on Sunday, October 19, 2008 at 2:02 PM. She came out weighing 6 lbs, 13 oz and is 20 inches in length. After many weeks of nesting, a week full of sporadic "real" contractions, and a false alarm last Friday, I decided on Saturday that I wanted to get this baby out. I walked the dog around the neighborhood (and up hills) in the morning, we went to the Linens N' Things liquidation sale (which was a madhouse), we visited two malls, went to our neighbor's grandson's birthday party, then walked the dog again - this time as a family. I finally started feeling strong, consistent contractions around 6:30pm. Around 8 pm, I realized that I wasn't going to make it to church in the morning and told Thom to go to the church drop off some brochures that I was supposed to hand out on Sunday. That was when he knew that this was the real thing. Once he got back, we got Mya in her jammies and took her to my parents' house. Long story short, I started at 4cm, we took the last bed in L&D, I was slow to dilate, water bag had to be broken twice, epidural didn't work for delivery (ouch), and baby was born after 15 hours of being in the hospital. We left the hospital a little less than 24 hours after Solana was born. I know people say you should take advantage of your hospital stay and get your rest and help. But I had the hardest time getting up and down off the bed because I'm short. I was in so much pain that I had to figure out creative methods of getting the baby out of the bassinet without having to get out of bed (again, because I'm short, I couldn't just reach over and get her). Hospital food was okay. I liked my breakfast. Anyway, after we left the hospital, we headed straight for Solana Beach. Thom took Solana with him while standing in the ocean. After we got our photos, we headed for an oil change, then went to my parents house to eat and finally headed home at 7pm. We had visitors (the dog sitters) for a little bit and then finally went to bed as a family of 4. Solana is nursing well. She's a good baby - hardly cries. Mya is a proud big sister and a good helper. I'm doing fine. Pain is much more noticeable this time around - even though Mya's birth was more traumatic. Yaay - I get to do projects for two grls now!
  Ah, I'm finally caught up! This was one of my latest projects - a scratchpad and crayon roll. Mya got invited to a birthday party for a set of fraternal twins - a girl and a boy. So I racked my brain as to what to get them for a gift. We usually opt not to get toys for gifts (unless it's educational or promotes creativity) for the same reason we dread any addition to Mya's toy collection - it just becomes clutter after she loses interest in it. I did a search online and remembered seeing instructions for a crayon roll. What a perfect gift - it's practical, portable, refillable, and can be used for as long as kids like to color with crayons! I wanted to add some paper to this crayon roll. I thought about how it would be handy to have when you need to keep kids busy while you're running errands with them. I found these instructions online: Crayon Roll Tutorial and made an additional 4" width and overall 1" extra in height to make room for the scratch pad (available at any office supply store). It was quite easy to do and I cranked these babies out in about an hour. Instead of using ribbon to keep it together, I used black elastic loop. I figured that little hands wouldn't be able to properly tie a ribbon to keep this together. My husband recommended that next time I make these, I should create a top flap so that the contents of the roll won't fall out. I agreed - my makeup brush roll has a top flap and it does the job! Well, now I know what all my friends kids are getting for Christmas!! Here's a pic of the girl's and boy's crayon roll:  I used brown for the inside back of both rolls with pink pockets for the girl, yellow pockets for the boy.
 Ever since I took the quilting class, I've been planning on making a quilt for Mya's room. When I was pregnant with Mya, I designed her room so that she could grow into it and not have it be so baby-ish. I made all the crib bedding and matching curtains. Now that she moved on to a "big girl" bed, she didn't have any coordinating bedding. I did a search and found that comforters (especially quilts) ran around $100. I was on a mission to beat that price by doing myself. I found a quilt that I liked online and based the layout after it. I wanted to add my personal touch with some appliqué work. Thom and Mya flew out of town for a week to visit Grammy and I worked on the quilt and pillow sham for 5 days straight. It was really fun to do. I learned a lot while making this quilt: - Fat batting = pin closer together (I had a lot of bunching in a few places - the top was not taut enough)
- Quilting with a darning foot and dropped feed dogs is a balance between the speed of the needle and speed of the fabric
- Quilting uses A LOT of thread
- A lead pencil is sometimes better than the water-soluble pencils when drawing on your quilt.
- Using a zigzagger on straight-stitch machine can make you dizzy.
- The ripper is my best friend
 Here's a shot of the appliqué work. I zigzagged around all the appliqués since it would have taken me forever to hand-stitch it. There's a bird of paradise, a nipa hut (my homage to the "bahay kubo" in the Philippines), a tropical leaf, plumerias, and bamboo. On the side is a butterfly and a palm tree with the sun setting behind it. By the way, material cost me $65. Extra thread and bobbins - $6. Time and effort - priceless :) .
 Notice a theme here? Let me introduce you to my Vintage Singer 301a - a badass, all-metal, gear-driven, slant-shank, straight-stitch machine with a longbed and carrying case. I was on the hunt for a good sewing machine for many months when my friend, Pam, steered me towards this vintage machine. She said that Singer machines made in this era (1950's-mid 60's) were very reliable and were built to run forever (or something to that extent). I did some research and found rave reviews of the 301a and even got to try Pam's. I loved how quietly and effortlessly it ran (I quilted my sampler quilt with her 301a) so I went on a mission to find one. I did a search on Craigslist and one lady said she had one. By the time I got there to take a look at it she already sold it. So I turned to Ebay. It was the first time I've ever bid on a popular item. Boy was it competitive!! I lost about 3 auctions until I finally won this for $108 (including shipping). What a great deal! I eventually bought a zigzagger (which is interesting to use - it moves the fabric, not the needle) and a set of attachments/presser feet. My 301a arrived the Wednesday after I made my shirred dress. It came with the same blue thread and a fabric/stitching sample that they showed on the Ebay listing. I tried it out and absolutely loved it. So I let the machine and case "air out" its antique smell for the day. Here's where the cat-killing comes in. Thursday morning, I woke up to Hugs puking on our bed. I immediately thought of the machine and ran downstairs. The spool of blue thread was still there but the machine wasn't threaded. I couldn't recall if I had wound it or kept it threaded. So we took a wait-and-see approach to our cat's puking. We hoped she would cough it up like she did the brown thread. A week goes by and Hugs is not getting any better. So I took her to the vet and they found the blue thread wrapped around her tongue. They gave us the option of either $1500 for the surgery or euthanasia for $100. Long story short, we talked them into another alternative where they would try to pull the string out while the cat was tranquilized. They did the procedure and called me 15 minutes later to tell me that they noticed that her belly moved and that the thread was wrapped around her intestines too. So that meant I had to opt for euthanasia. Sobbing, I went back to the vet and waited to say goodbye to our dear cat. I got called into the exam room when the surgeon came out and said, "Well, we got it out!" Boy were we lucky. The string was 2 feet long with about a 1 inch knot at the end of it (where it was getting into her intestine). The vet was amazed that she lasted more than a week like this. He said that in most cases that he's seen, the thread caused the cat's intestines to tangle up within 1-2 days. Hugs was definitely very lucky. She's probably used up 8 of her 9 lives with this ordeal. Now I keep a good eye on my thread and machine. I can now use my 301a without the guilt that it killed my cat. (cue the "Debbie Downer" theme song).
 My husband and I were invited to a Luau for an acquaintance of his in mid-August. While I had a few pre-pregnancy "tropical" outfits, I didn't have one that would fit my growing belly. So I did a search online and found a few shirred dresses worn by pregnant celebrities and was inspired to make my own. A few months ago, I was going through my stash of fabrics and found a cute white eyelet fabric that would make a perfect summer top for Mya. I wanted to try shirring for a while but never had the guts to do it until I found this tutorial: Sunny Day Dress and Top Tutorial. It seemed so easy - and it was! So I went to Joann's, bought some elastic thread and sewed away. I still had a lot of elastic thread leftover for my own dress so I found some comfortable stretchy fabric that had sort of a tropical feel to it. I worked on the dress late on a Saturday morning and had it ready to wear by the evening, complete with adjustable straps. I wasn't satisfied with my hemming job (my machine kept hanging up on the fabric) and had a few crooked stitches. But I was in a hurry so I figured that I'd fix it in the morning (no one would notice my mistake at night). Here's where the "almost killed the cat" came in. On Sunday morning, I went back to my sewing machine so I can fix the hem and noticed that my spool of brown thread was empty. I immediately thought of my string-aficionado cat, Hugs, who must have eaten it. We went to church and when we got back, we were welcomed by some cat puke on the floor with a bunch of brown thread. Boy, was I glad she got it out. I knew that string consumption can do quite some damage to a cat.  The photos that you see here are pretty recent and showcase my 9-month belly during my baby shower. This is a photo of my childhood friend, Aileen, who made this super-cute diaper cake. I have worn the dress quite a few times and it is very comfortable. I'll even be able to wear it postpartum! Hooray for shirring!
In August, I was commissioned to make a chicken-shaped cake. It was my first commissioned cake and I was pretty excited about it. It turns out that the cake was due the day before my friends' cake. So I had 3 days to make 2 cakes. That week, there was a heat wave with monsoonal moisture coming through San Diego and I feared that it might jeopardize the cakes. Fondant covered cakes plus heat and humidity usually means disaster. So I cleared a lot of room in the fridge to protect my work. Plus, I did mostly everything at night so that it's cooler. Chicken Cake
 The chicken cake was chocolate with a chocolate mousse filling. I started out by making a few round pans of chocolate cake, cooling it, filling and stacking it, and then finally carving it. I carved out the body and had other plans for the head and tail. (Here you get a little peek of our new lovely kitchen countertop!) I found my old lazy susan and was able to smoothly turn the cake while carving. I saved the leftovers for the chicken's eggs. I crumb coated the top then it went straight to the fridge.  I made some marshmallow rice cereal treats and shaped them as the head and tail. Once it cooled, I covered it in fondant and covered the chicken body in fondant. The head and tail were then attached with a bunch of skewers. I used a leaf shaped cutter to cut out the feathers and I hand-cut the eye and comb of the chicken. Those were then attached to the "bald chicken" with royal icing. Since it was still warm and humid (yes, at night with the AC on) I noticed that the head and tail were starting to sag. So I reinforced it with more skewers and quickly stuck it in the fridge. Luckily it stayed that way. I made the eggs using the "cake balls" technique and covering them with fondant. Here's the end result: 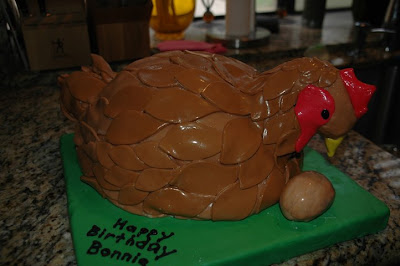 Notice how shiny it is? That's the heat and humidity working! Bauer 2008 CakeMy friends (husband/wife) had a joint birthday on the day after the opening ceremonies of the Olympics. They made their birthday Olympic themed with unique games such as a cannon ball competition, slow-mo relay, doggie paddle, races and a few more. So I volunteered to make them a cake to reflect their Olympic theme. The cake was a white cake with a key lime filling frosted with a rich whipped cream. I don't know that the whipped cream was a good idea due to the weather. But I took my chances. I made a few shortcuts with this cake since I was a bit burned out from the chicken cake (pregnancy sure gives you carpal tunnel when you're working on cakes). My Olympic rings didn't turn out so smoothly because I didn't use a piping tip (I just used a cut plastic bag). And my hands were so tired from rolling fondant for 2 days. By the time I was done piping the cake, I noticed that my fondant circles were migrating down the cake. So I had to put in some reinforcement (toothpicks) below each fondant. I quickly drove over to my friends' place and immediately placed it in the fridge. In the end, my friends were pretty happy with the cake. Here's the top:  The right side - see the cannonball icon?  The left/front - the doggie paddle and slow-mo icons.  The cake tasted great - all the guests loved it. Plus it was quite tall!! I didn't realize how tall it was until I put it in the box. I think I should have used a 12 inch box and base instead of a 10 inch. Next time I'll remember to not do whipped cream cakes in the Summer.
 Last September, I took a quilting class from my friend, Pam (who is, by the way, a very talented quilter and crafter). I put the blocks and sashing (the borders between the blocks) together last year and its been sitting on top of my sewing stuff for very close to a year. I've had the urge to finish the quilt so I could make another one. One thing that was holding me back was the lack of material. We just used fabric from Pam's HUGE stash in her studio. Unfortunately, the fabric I chose for my sashing wasn't enough to make an inner and outer border. Forward to late July, I headed over to Rosie's Calico Cupboard and found a fabric that would work and went to town on finishing the quilt top while using some creative piecing to make up for the lack of fabric for the border. Since Pam just taught us how to put the top together and I had to go back to her for some guidance on how to finish it in August. I was a bit impatient and made a few mistakes. But after actually "quilting" the quilt (connecting the top, batting and backing layers by stitching) and binding the edges, I just stuck it in the washer and dryer and magically, my mistakes went away! Or at least they hid behind the puffiness of the fabric. The photo above is my sampler quilt and the quilt behind me is one that Pam used as a reference for her quilting class. It's amazing how two quilts with the same blocks can have different looks just by fabric choice and block placement. Quilting is fun - but it will get me in trouble since I can probably do this all day and I'd spend a fortune at the fabric store.
  On April 26th, I threw my best friend from high school, Phuong, a tea party. It all started out as a Christmas gift. I treated her to a "Lady Anne Tea" at the Aubrey Rose Tea Room for a Christmas gift and she redeemed her gift at the end of January. Phuong works out of town for the majority of the week and I tend to get a once-a-month or once-every-other month visit with her due to both of our busy schedules. Knowing this, I brought up her birthday and offered to throw her a tea party since we both love having tea so much. March came around when I found out that I was pregnant, so I needed to plan the party in between all the other activity that was soon to happen (renovations, Easter, visitors, travelling) so I wouldn't get burned out. I planned to have a "Mad Hatter Tea" where people wear hats and there's an mild "Alice in Wonderland" air to the event. The colors were vibrant - hot pink, lime green, and aqua blue. After much searching, we held the party at Briercrest Park in La Mesa - a nice quiet park with gentle rolling terrain. The invitations reflected the tone of the event. It was a hot pink gate-fold invitation with a white overlay accented with rhinestones, with a green and blue ribbon around it. I made it the perfect size to fit our leftover RSVP envelopes from our wedding.   A strong Santa Ana blew in the day of the party so it was warm and windy - especially for April. We struggled a bit with the curtains and prayed that the tent wouldn't blow over. But everything turned out just fine. I kept the menu close to a traditional tea with a few modern twists... (Thanks Sherry for taking photos! I can't believe I forgot my camera!!) 1st Course
Sun-Dried Tomato Palmiers
Feta and Olive mini-quiches
 2nd CourseCucumber Sandwich Egg-Salad Sandwich Smoked Salmon Pinwheel Pear, Proscuitto and Gorgonzola Sandwich  Intermezzo Intermezzo Grapes, Strawberries, Melon
 3rd Course/Dessert 3rd Course/DessertGinger Scone with Cream and preserves Cherry Petit Fours (birthday cake) Mini Pecan Tassies BeveragesAssorted Hot Teas Iced Tea Water Strawberry Citrus Sparkler   Decorations DecorationsPink and Blue Lanterns, Green tissue pom hanging Fuschia Petunias with Teapot centerpiece and playing cards  Favors FavorsPink, Green, and Blue Purse Boxes filled with decorated sugar cubes, a peach tea bag and a heart-shaped cookie inscribed with "Eat Me" I brought my fine Noritake china to the party and was pretty confident that they would stay intact. I got out our 10x10 pop up tent and some old curtains for extra shade. Am I glad I brought that! The party went well even with being 12 weeks pregnant. I think I handled it in stride. I battled an ant raid in our kitchen while preparing the food and had to deal with a kitchen that didn't have all the small appliances and tools in place. Nor did we have floors in the house! I'm glad that none of that reflected during the party. The guests really enjoyed the party and that's all that matters.
Yes, I haven't posted in a while. A lot has happened since the last post. Let's see... BIG NEWS - I'm pregnant with #2! It's a girl and I'm doing fine. We figured it was a result of our anniversary month - which means she's due around Mya's birthday. (Mya was a result of our honeymoon. Hence the name "Mya" for the Mayan ruins that we visited.) I'm currently 34 weeks along, due on November 4th and can't wait to meet her. Mya's quite excited to have a baby sister. She's even thought of some names while we struggle for just one! After finding out about the pregnancy, we started our kitchen/whole downstairs remodel. The kitchen/bar/laundry room part of it wasn't bad at all. We had a great contractor who finished the work in two weeks and a few days. Thom's cousin helped put in floors about 2 weeks after that and then helped with the crown and baseboard downstairs. We're currently working on the fireplace and furnishing the house with stuff we found on Craigslist. I'm quite happy that we have a dining table now. I feel civilized eating dinner at a dinner table now instead of sitting in front of the TV. Thom has been flying out of town since the end of April to help his mother with her double knee surgery recovery. So I've been left to my own devices quite a bit (with Mya in tow for 3 of the 4 visits). Between my mother-in-law's surgeries, we went to Missouri to celebrate Thom's grandfather's 80-1/2 birthday. This last time Thom left, he took Mya with him so I had the house to myself - happy me! Thom threw me a surprise 30th birthday at Costco this past July. Yes it sounds funny but it was quite a unique event. Mya started 5-day a week / 3 hours a day preschool late in August. They moved to a nice renovated building on the church campus. It's been quite an event for the whole parish. One of our cats nearly died from eating thread from a sewing machine that I got on Ebay. It was a huge ordeal - at one point I thought I would have to put her down. But she's perfectly fine now. During all this time, I've done a few projects here and there - some of which I'll post about. I threw my best friend, Phoung, a 30th birthday party. I finished my sampler quilt and made a quilt for Mya's "big girl" bed. I made a dress that accomodates my growing belly (and that I can wear postpartum). I also made a couple of interesting cakes - one is a chicken. Look out for these posts! I'll start in chronological order.
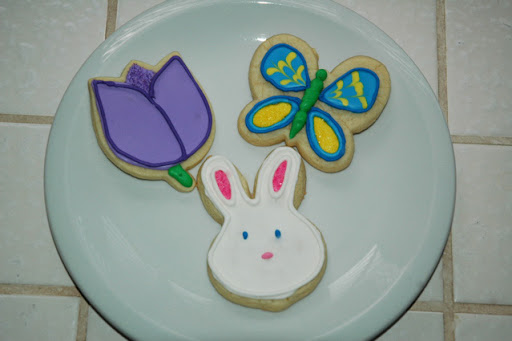 I did another batch of cookies. This time it's for my church's bake sale. Mya helped by cutting out the cookies. With little kids, you kind of have to guide them as to where to place the cutters on the dough with the least waste. In my case, I placed the cutters and Mya pushed them down and popped them out. She also helped me roll out the dough using my nifty dowel guide system. Usually, she helps with the sprinkles but it was late at night when I decorated. Plus, she had a cold and I didn't want her licking the sprinkles off her fingers then touching the cookies. I donated 8 sets of 3 cookies, nicely packaged in cello bags filled with Easter grass. All the money goes to the church to pay for their eucharistic supplies. Luckily, I didn't have to sit and sell these - the ladies at the Women's Guild took care of that. I was stuck as to how much I should price these. Thom, being the sales guy that he is said to price them at $6/set. But there's a fine line between what they're actually worth and what people at our church would pay. Honestly, the bake and craft sales have been dotted by middle of the road tasting and presented baked goods. It's basically a bunch of quick-breads and cookies placed on a paper plate and wrapped in colored saran wrap. So cakes and breads were normally priced at around $2-$3. A plate full of cookies would go for a buck or two. So I posted this pic on a message board I belong to and asked how I should price the cookies. I got ranges between $3-$5 —Which was pretty accurate in my mind. So I priced them at $5 per set. Thom dropped the cookie bags off at church this morning. He said that they were the best looking cookies and the best presented items on the table. (I'll get photos of the table later.) We didn't stay for mass at our parish since we were going to the Mission (where we were married) for mass. So we couldn't see the sales progress. Instead Thom called one of the volunteers after the bake sale to see how well they sold. The verdict... 1. They've never had cookies that looked so good or were well presented. 2. They usually sell cookies for 50-75 cents a piece 3. All the bags sold at the $5 price 4. Everyone at the Women's Guild were SHOCKED they sold for that much 5. We just made $40 for the church :) It goes to show, putting your time and effort to make things nice will pay in the end. I'm glad I got to do my part in helping. Plus, I got to buy some fun cookie cutters out of it! Next up... St. Patrick's Day cookies! I'll be baking about 150 shamrock cookies for a Lenten Fish Dinner this Friday. Whoo hoo! More cookie baking - more frosting!!
 We had an expensive anniversary dinner at Humphrey's last Thursday. When Thom received his meal, he looked at the measley 5 sea scallops and laughed. He felt like the Visa commercial where their expensive dinner was a plate full of tiny food. The following weekend Thom was in the mood for some more scallops (to make up for what his dinner lacked). We looked at Costco where they sold it for $10/lb. Then I mentioned that we should go to the Asian markets since their seafood prices are much better. So off to Vien Dong we went. Mya loves going there to see the fish and was quite excited to hear that we were going back. We spotted the sea scallops but Thom wanted the bay scallops since they were cheaper. We also picked up a frozen seafood variety pack. But we weren't done though... I showed him the tank of Dungeness crab (which Mya was insisting on seeing). I said that he had to "fish" for them to get one out. He rolled up a sleeve, grabbed a tong and started fishing for a crab in the frigid water to show Mya (what a great sport). He looked at the price ($5.99/lb) and decided he wanted a crab for dinner. We fished for another crab (that Mya named "cupcake") and stuck it in a heavy-duty bag. Back home, I filled a stock pot with a little water, a steamer basket started to bring it to a boil. Meanwhile, Thom took photos of the crab and battled it with a pairing knife (vs. the claw). To our amusement, the crab flipped itself over several times while on the counter and in the sink. Once the water was at a rolling boil, I threw in a halved lemon, a halved garlic, some spices and fresh basil and parsley. I said my "good-byes" to cupcake and shoved it in the pot. 15 minutes later he was done. Thom never had a whole crab before so I took the crab apart. Boy was it good. Mya loved it too. The bay scallops were a disappointment though, oh well.
I quickly put together this template in Photoshop, placed the images where I wanted them in Dreamweaver and inserted Blogger codes to make it work. Sounds easy, right? Well, Blogger recommends that you copy one of their templates and just modify it - rightly so. I didn't have enough time to actually learn how blogger works. Plus, I'm a "learn-by-doing" kind of gal. So this seemed like the way to go. I had my template sitting on my computer for a week before I even attempted to attack this monster. But while modifying and testing code, I found it surprisingly self-explanatory (but quite messy).
I'm sure there's more fancy schmancy things I could do with this but I'm all programmed out this week. I think I've programmed websites and databases all week long and my brain needs a rest.
On a baking note...
I regret that I didn't take photos of the Valentine's day cookies I made for Mya's Preschool. Mya helped put on the sprinkles and I was quite happy (and almost giddy) with the way they turned out.
My nephew, Brandon, came over the other day so I busted out the cookie dough and Mya, Brandon and I made some mini-heart cookies. I piped, they sprinkled. I did a little sprinkling as well. Here's the fruit of our labor:
 
I hope you all had a wonderful Valentine's Day!
|