
That week, there was a heat wave with monsoonal moisture coming through San Diego and I feared that it might jeopardize the cakes. Fondant covered cakes plus heat and humidity usually means disaster. So I cleared a lot of room in the fridge to protect my work. Plus, I did mostly everything at night so that it's cooler.
Chicken Cake
 The chicken cake was chocolate with a chocolate mousse filling. I started out by making a few round pans of chocolate cake, cooling it, filling and stacking it, and then finally carving it. I carved out the body and had other plans for the head and tail. (Here you get a little peek of our new lovely kitchen countertop!) I found my old lazy susan and was able to smoothly turn the cake while carving. I saved the leftovers for the chicken's eggs. I crumb coated the top then it went straight to the fridge.
 I made some marshmallow rice cereal treats and shaped them as the head and tail. Once it cooled, I covered it in fondant and covered the chicken body in fondant. The head and tail were then attached with a bunch of skewers.
I used a leaf shaped cutter to cut out the feathers and I hand-cut the eye and comb of the chicken. Those were then attached to the "bald chicken" with royal icing. Since it was still warm and humid (yes, at night with the AC on) I noticed that the head and tail were starting to sag. So I reinforced it with more skewers and quickly stuck it in the fridge. Luckily it stayed that way.
I made the eggs using the "cake balls" technique and covering them with fondant.
Here's the end result:
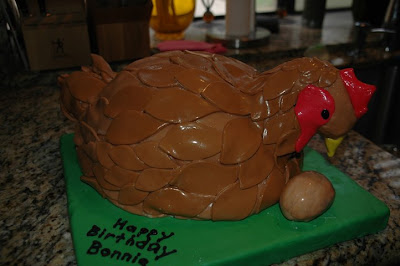 Notice how shiny it is? That's the heat and humidity working!
Bauer 2008 Cake
 Notice how shiny it is? That's the heat and humidity working!
Bauer 2008 Cake
My friends (husband/wife) had a joint birthday on the day after the opening ceremonies of the Olympics. They made their birthday Olympic themed with unique games such as a cannon ball competition, slow-mo relay, doggie paddle, races and a few more. So I volunteered to make them a cake to reflect their Olympic theme.
The cake was a white cake with a key lime filling frosted with a rich whipped cream. I don't know that the whipped cream was a good idea due to the weather. But I took my chances. I made a few shortcuts with this cake since I was a bit burned out from the chicken cake (pregnancy sure gives you carpal tunnel when you're working on cakes). My Olympic rings didn't turn out so smoothly because I didn't use a piping tip (I just used a cut plastic bag). And my hands were so tired from rolling fondant for 2 days. By the time I was done piping the cake, I noticed that my fondant circles were migrating down the cake. So I had to put in some reinforcement (toothpicks) below each fondant. I quickly drove over to my friends' place and immediately placed it in the fridge. In the end, my friends were pretty happy with the cake.
The cake was a white cake with a key lime filling frosted with a rich whipped cream. I don't know that the whipped cream was a good idea due to the weather. But I took my chances. I made a few shortcuts with this cake since I was a bit burned out from the chicken cake (pregnancy sure gives you carpal tunnel when you're working on cakes). My Olympic rings didn't turn out so smoothly because I didn't use a piping tip (I just used a cut plastic bag). And my hands were so tired from rolling fondant for 2 days. By the time I was done piping the cake, I noticed that my fondant circles were migrating down the cake. So I had to put in some reinforcement (toothpicks) below each fondant. I quickly drove over to my friends' place and immediately placed it in the fridge. In the end, my friends were pretty happy with the cake.
Here's the top:

The right side - see the cannonball icon?

The left/front - the doggie paddle and slow-mo icons.


The right side - see the cannonball icon?

The left/front - the doggie paddle and slow-mo icons.

The cake tasted great - all the guests loved it. Plus it was quite tall!! I didn't realize how tall it was until I put it in the box. I think I should have used a 12 inch box and base instead of a 10 inch. Next time I'll remember to not do whipped cream cakes in the Summer.


